In this tutorial we'll learn how to use PySide to create desktop applications with Python.
First we'll create a series of simple windows on your desktop to ensure that PySide is working and introduce some of the basic concepts. Then we'll take a brief look at the event loop and how it relates to GUI programming in Python. Finally we'll look at Qt's QMainWindow which offers some useful common interface elements such as toolbars and menus. These will be explored in more detail in the subsequent tutorials.
Creating an application
Let's create our first application! To start create a new Python file — you can call it whatever you like (e.g. app.py) and save it somewhere accessible. We'll write our simple app in this file.
We'll be editing within this file as we go along, and you may want to come back to earlier versions of your code, so remember to keep regular backups.
The source code for the application is shown below. Type it in verbatim, and be careful not to make mistakes. If you do mess up, Python will let you know what's wrong.
from PySide2.QtWidgets import QApplication, QWidget

# Only needed for access to command line arguments
import sys

# You need one (and only one) QApplication instance per application.
# Pass in sys.argv to allow command line arguments for your app.
# If you know you won't use command line arguments QApplication([]) works too.
app = QApplication(sys.argv)

# Create a Qt widget, which will be our window.
window = QWidget()
window.show()  # IMPORTANT!!!!! Windows are hidden by default.

# Start the event loop.
app.exec_()


# Your application won't reach here until you exit and the event
# loop has stopped.
First, launch your application. You can run it from the command line like any other Python script, for example --
python3 app.py
Run it! You will now see your window. Qt automatically creates a window with the normal window decorations and you can drag it around and resize it like any window.
What you'll see will depend on what platform you're running this example on. The image below shows the window as displayed on Windows, macOS and Linux (Ubuntu).
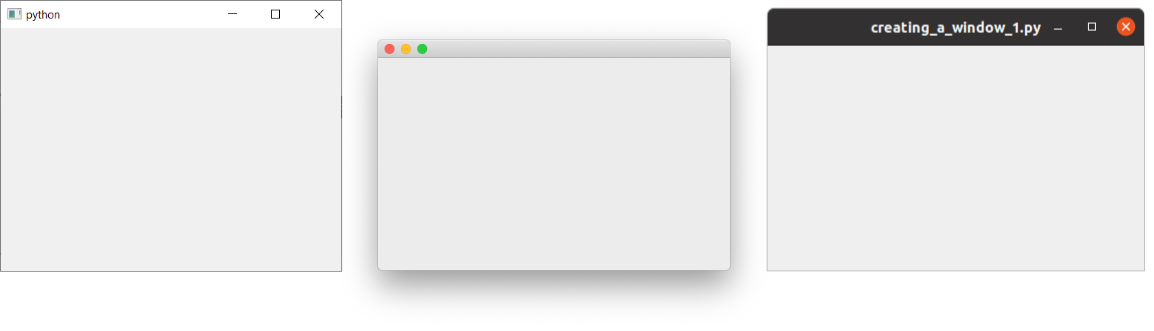 Our window, as seen on Windows, macOS and Linux.
Stepping through the code
Let's step through the code line by line, so we understand exactly what is happening.
First, we import the PySide classes that we need for the application. Here we're importing QApplication, the application handler and QWidget, a basic empty GUI widget, both from the QtWidgets module.
from PySide2.QtWidgets import QApplication, QWidget
The main modules for Qt are QtWidgets, QtGui and QtCore.
You could do from <module> import * but this kind of global import is generally frowned upon in Python, so we'll avoid it here.
Next we create an instance of QApplication, passing in sys.arg, which is Python list containing the command line arguments passed to the application.
app = QApplication(sys.argv)
If you know you won't be using command line arguments to control Qt you can pass in an empty list instead, e.g.
app = QApplication([])
Next we create an instance of a QWidget using the variable name window.
window = QWidget()
window.show()
In Qt all top level widgets are windows -- that is, they don't have a parent and are not nested within another widget or layout. This means you can technically create a window using any widget you like.
Widgets without a parent are invisible by default. So, after creating the window object, we must always call .show() to make it visible. You can remove the .show() and run the app, but you'll have no way to quit it!
What is a window? - Holds the user-interface of your application - Every application needs at least one (...but can have more) - Application will (by default) exit when last window is closed
Finally, we call app.exec_() to start up the event loop.
What's the event loop?
Before getting the window on the screen, there are a few key concepts to introduce about how applications are organised in the Qt world. If you're already familiar with event loops you can safely skip to the next section.
The core of every Qt Applications is the QApplication class. Every application needs one — and only one — QApplication object to function. This object holds the event loop of your application — the core loop which governs all user interaction with the GUI.
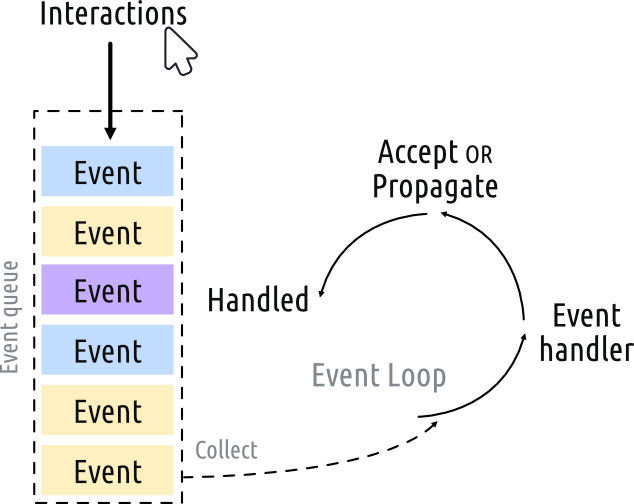
Each interaction with your application — whether a press of a key, click of a mouse, or mouse movement — generates an event which is placed on the event queue. In the event loop, the queue is checked on each iteration and if a waiting event is found, the event and control is passed to the specific event handler for the event. The event handler deals with the event, then passes control back to the event loop to wait for more events. There is only one running event loop per application.
The QApplication class
- QApplication holds the Qt event loop
- One QApplication instance required
- You application sits waiting in the event loop until an action is taken
- There is only one event loop at any time
The underscore is there because exec was a reserved word in Python 2.7. PySide handles this by appending an underscore to the name used in the Qt library. You'll also see .print_() methods on widgets for example.

Also available from Leanpub and Amazon Paperback
Purchasing Power Parity
Developers in [[ country ]] get [[ discount.discount_pc ]]% OFF on all books & courses with code [[ discount.coupon_code ]]QMainWindow
As we discovered in the last part, in Qt any widgets can be windows. For example, if you replace QtWidget with QPushButton. In the example below, you would get a window with a single push-able button in it.
import sys
from PySide2.QtWidgets import QApplication, QPushButton

app = QApplication(sys.argv)

window = QPushButton("Push Me")
window.show()

app.exec_()
This is neat, but not really very useful -- it's rare that you need a UI that consists of only a single control! But, as we'll discover later, the ability to nest widgets within other widgets using layouts means you can construct complex UIs inside an empty QWidget.
But, Qt already has a solution for you -- the QMainWindow. This is a pre-made widget which provides a lot of standard window features you'll make use of in your apps, including toolbars, menus, a statusbar, dockable widgets and more. We'll look at these advanced features later, but for now, we'll add a simple empty QMainWindow to our application.
import sys
from PySide2.QtWidgets import QApplication, QMainWindow

app = QApplication(sys.argv)

window = QMainWindow()
window.show()

# Start the event loop.
app.exec_()
Run it! You will now see your main window. It looks exactly the same as before!
So our QMainWindow isn't very interesting at the moment. We can fix that by adding some content. If you want to create a custom window, the best approach is to subclass QMainWindow and then include the setup for the window in the __init__ block. This allows the window behavior to be self contained. We can add our own subclass of QMainWindow — call it MainWindow to keep things simple.
import sys

from PySide2.QtCore import QSize, Qt
from PySide2.QtWidgets import QApplication, QMainWindow, QPushButton


# Subclass QMainWindow to customize your application's main window
class MainWindow(QMainWindow):
    def __init__(self):
        super().__init__()

        self.setWindowTitle("My App")

        button = QPushButton("Press Me!")

        # Set the central widget of the Window.
        self.setCentralWidget(button)


app = QApplication(sys.argv)

window = MainWindow()
window.show()

app.exec_()
For this demo we're using a QPushButton. The core Qt widgets are always imported from the QtWidgets namespace, as are the QMainWindow and QApplication classes.
When using QMainWindow we use .setCentralWidget to place a widget (here a QPushButton) in the QMainWindow -- by default it takes the whole of the window. We'll look at how to add multiple widgets to windows in the layouts tutorial.
When you subclass a Qt class you must always call the super __init__ function to allow Qt to set up the object.
In our __init__ block we first use .setWindowTitle() to change the title of our main window. Then we add our first widget — a QPushButton — to the middle of the window. This is one of the basic widgets available in Qt. When creating the button you can pass in the text that you want the button to display.
Finally, we call .setCentralWidget() on the window. This is a QMainWindow specific function that allows you to set the widget that goes in the middle of the window.
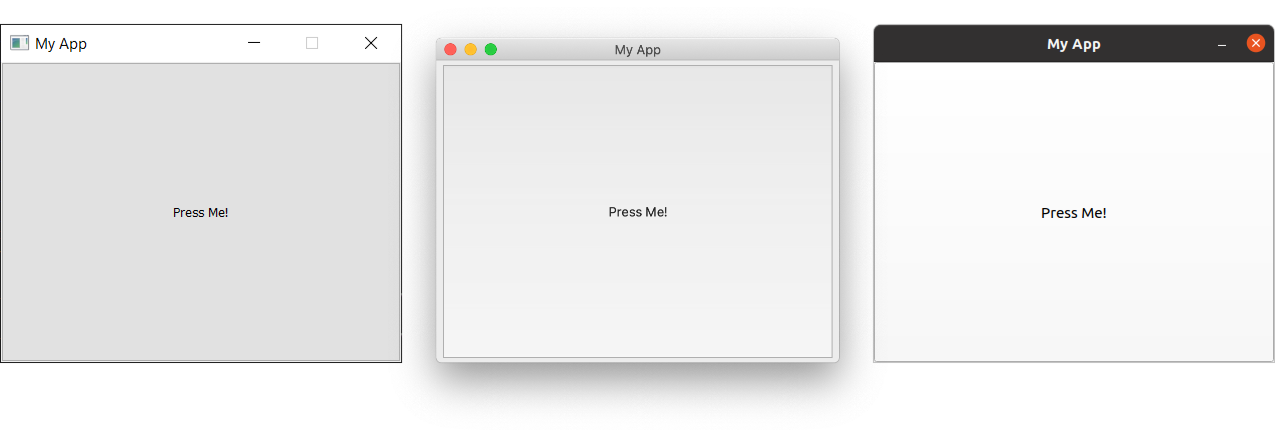
Run it! You will now see your window again, but this time with the QPushButton widget in the middle. Pressing the button will do nothing, we'll sort that next.
 Our
Our QMainWindow with a single QPushButton on Windows, macOS and Linux.
We'll cover more widgets in detail shortly but if you're impatient and would like to jump ahead you can take a look at the QWidget documentation. Try adding the different widgets to your window!
Sizing windows and widgets
The window is currently freely resizable -- if you grab any corner with your mouse you can drag and resize it to any size you want. While it's good to let your users resize your applications, sometimes you may want to place restrictions on minimum or maximum sizes, or lock a window to a fixed size.
In Qt sizes are defined using a QSize object. This accepts width and height parameters in that order. For example, the following will create a fixed size window of 400x300 pixels.
import sys

from PySide2.QtCore import QSize, Qt
from PySide2.QtWidgets import QApplication, QMainWindow, QPushButton


# Subclass QMainWindow to customize your application's main window
class MainWindow(QMainWindow):
    def __init__(self):
        super().__init__()

        self.setWindowTitle("My App")

        button = QPushButton("Press Me!")

        self.setFixedSize(QSize(400, 300))

        # Set the central widget of the Window.
        self.setCentralWidget(button)


app = QApplication(sys.argv)

window = MainWindow()
window.show()

app.exec_()
Run it! You will see a fixed size window -- try and resize it, it won't work.
 Our fixed-size window, notice that the _maximize control is disabled on Windows & Linux. On macOS you can maximize the app to fill the screen, but the central widget will not resize._
As well as .setFixedSize() you can also call .setMinimumSize() and .setMaximumSize() to set the minimum and maximum sizes respectively. Experiment with this yourself!
You can use these size methods on any widget.
In this section we've covered the QApplication class, the QMainWindow class, the event loop and experimented with adding a simple widget to a window. In the next section we'll take a look at the mechanisms Qt provides for widgets and windows to communicate with one another and your own code.
