In previous tutorials we've used the Qt Widgets API for building our applications. This has been the standard method for building applications since Qt was first developed. However, Qt provides another API for building user interfaces: Qt Quick. This is a modern mobile-focused API for app development, with which you can create dynamic and highly customizable user interfaces.
QtQuick
Qt Quick uses a declarative scripting language -- the Qt Modeling Language (QML) -- to define user interfaces. With it you can build completely custom UIs, with dynamic graphical elements and fluid transitions and effects. UIs built with QML have more in common with mobile apps than traditional desktop applications, reflecting it's origin with Nokia, but Qt Quick can be used on all platforms supported by Qt.
QML syntax also supports embedded Javascript which can be used to handle application logic -- in simple applications the entire app can be implemented in the QML! But using PyQt/PySide you can also write your application code in Python and hook this up to your QML. This has the advantage of keeping your UI design (QML) and business logic (Python) implementation properly isolated, and gives you access to all the Python libraries to power the backend of your app.
Before starting this tutorial you will need to install PyQt or PySide, see the installation guides.
For building QML applications you can use PyQt5, PySide2, PyQt6 or PySide6. If using Qt 6 you will need v6.1 or later.
Getting started
In this tutorial we will be using PyQt/PySide with the Qt Quick/QML API.
If you've used Qt Widgets before, many of the Qt Quick concepts will seem familiar. While QML does not make use of QtWidget classes, all the other parts of Qt (QtCore, QtGui, etc.) are still available.
Before we start writing out application, we can set up our project folder with the files we'll need in the right structure below. You can also download a zip file containing these files.
- Create a project folder for the app, in our example we will call it:
clock - Inside your
clockfolder create an empty file namedmain.py - Create a file alongside
main.pynamedmain.qml, to hold our UI definition in QML - Create an empty folder alongside the
main.pyandmain.qmlcalledimages

Also available from Leanpub and Amazon Paperback
Purchasing Power Parity
Developers in [[ country ]] get [[ discount.discount_pc ]]% OFF on all books & courses with code [[ discount.coupon_code ]]Creating a “Hello World” app
Open up the main.py in your editor and add the following skeleton code. This is the bare minimum code required to load a QML file and display it using the QML application engine.
main.py
import sys

from PyQt5.QtGui import QGuiApplication
from PyQt5.QtQml import QQmlApplicationEngine


app = QGuiApplication(sys.argv)

engine = QQmlApplicationEngine()
engine.quit.connect(app.quit)
engine.load('main.qml')

sys.exit(app.exec())
The above code calls QGuiApplication and QQmlApplicationEngine Which will use QML instead of QtWidgets as the UI layer for the Qt Application. It then connects the UI layers quit function with the app’s main quit function. So both can close when the UI has been closed by the user. Next it loads the QML file as the QML code for the UI. The app.exec() starts the Qt event loop and launches the application, just as in Qt Widgets.
Here the call to app.exec() is wrapped inside sys.exit() to return the exit code to the calling process in case of errors, but this isn't strictly necessary.
Next, add the following code to the main.qml.
main.qml
import QtQuick 2.15
import QtQuick.Controls 2.15

ApplicationWindow {
    visible: true
    width: 600
    height: 500
    title: "HelloApp"

    Text {
        anchors.centerIn: parent
        text: "Hello World"
        font.pixelSize: 24
    }

}
The above code creates a Window with a width and height as specified, a title of HelloApp and a Text object that is centered in the parent (in this case the window). The text displayed is “Hello World”, with a pixel size of 24px.
The visible: true is very important, without that the UI will be created but will be invisible!
Once you have entered the above code into the two files and saved them, you can run it and see the result.
You can run the code like any other Python script -- navigate into the folder containing the main.py script and run it
using python (or python3 depending on your system).
$ cd clock
$ python main.py
When the application launches you should see a window which looks like the following.
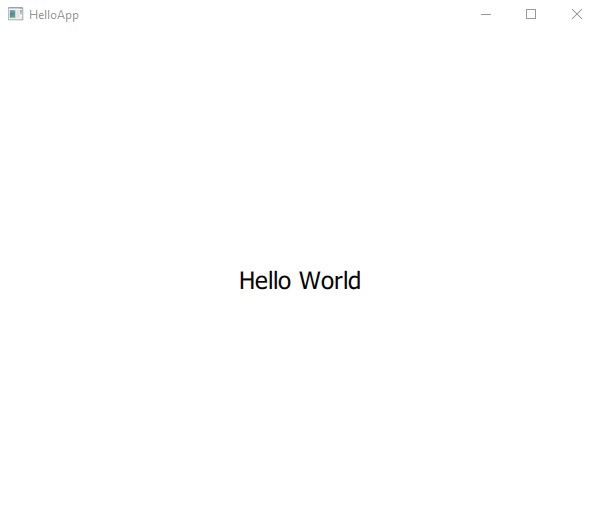
Success! We have a QML application, although it's very basic to start with. Next we'll modify the UI to make it a little more interesting and build towards a simple clock.
Updating the UI design
First lets add an image as a background.
Place this image in the folder we created earlier named images.
This will be the background for our application window.
 A simple background image with a gradient effect
If you like, you can substitute any other image you have. We'll be placing white text over it, so dark simple images will work better.
main.qml
import QtQuick 2.15
import QtQuick.Controls 2.15

ApplicationWindow {
    visible: true
    width: 400
    height: 600
    title: "Clock"

    Rectangle {
        anchors.fill: parent

        Image {
            anchors.fill: parent
            source: "./images/background.png" srcset="https://ik.imagekit.io/mfitzp/pythonguis/static/tutorials/qml-qt-quick/first-qml-project/background.png?tr=w-100 100w, https://ik.imagekit.io/mfitzp/pythonguis/static/tutorials/qml-qt-quick/first-qml-project/background.png?tr=w-200 200w, https://ik.imagekit.io/mfitzp/pythonguis/static/tutorials/qml-qt-quick/first-qml-project/background.png?tr=w-400 400w, https://ik.imagekit.io/mfitzp/pythonguis/static/tutorials/qml-qt-quick/first-qml-project/background.png?tr=w-600 600w" loading="lazy" width="564" height="1003"
            fillMode: Image.PreserveAspectCrop
        }

        Rectangle {
            anchors.fill: parent
            color: "transparent"

            Text {
                text: "16:38:33"
                font.pixelSize: 24
                color: "white"
            }

        }

    }

}
In this QML file we've defined our main application window using the ApplicationWindow object type.
Within this we've defined a Rectangle and an Image which holds our background image, filling the parent. The fillMode defines how the image will be sized. In this example we've set the image to fill the parent window using anchors.fill: parent while preserving aspect ratio and cropping. This ensures the image fills the window area, without being deformed. You can also control the size of the image in memory by setting the sourceSize property, e.g.
        Image {
            sourceSize.width: parent.width
            sourceSize.height: parent.height
            source: "./images/background.png" srcset="https://ik.imagekit.io/mfitzp/pythonguis/static/tutorials/qml-qt-quick/first-qml-project/background.png?tr=w-100 100w, https://ik.imagekit.io/mfitzp/pythonguis/static/tutorials/qml-qt-quick/first-qml-project/background.png?tr=w-200 200w, https://ik.imagekit.io/mfitzp/pythonguis/static/tutorials/qml-qt-quick/first-qml-project/background.png?tr=w-400 400w, https://ik.imagekit.io/mfitzp/pythonguis/static/tutorials/qml-qt-quick/first-qml-project/background.png?tr=w-600 600w" loading="lazy" width="564" height="1003"
            fillMode: Image.PreserveAspectCrop
        }
This approach allows you some more control -- for example, you could scale an image to half the size of the parent window by dividing the sizes in two and use this to tile multiple images.
        Image {
            sourceSize.width: parent.width/2
            sourceSize.height: parent.height/2
            source: "./images/background.png" srcset="https://ik.imagekit.io/mfitzp/pythonguis/static/tutorials/qml-qt-quick/first-qml-project/background.png?tr=w-100 100w, https://ik.imagekit.io/mfitzp/pythonguis/static/tutorials/qml-qt-quick/first-qml-project/background.png?tr=w-200 200w, https://ik.imagekit.io/mfitzp/pythonguis/static/tutorials/qml-qt-quick/first-qml-project/background.png?tr=w-400 400w, https://ik.imagekit.io/mfitzp/pythonguis/static/tutorials/qml-qt-quick/first-qml-project/background.png?tr=w-600 600w" loading="lazy" width="564" height="1003"
            fillMode: Image.PreserveAspectCrop
        }
Alongside the Image we've also defined a transparent Rectangle which also fills the window. Since the rectangle is defined alongside the Image you might think it would appear adjacent in the UI, however since there isn't a layout defined on the window the elements are stacked -- the Rectangle appears on top of the Image.
By default Rectangle objects have a white background.
Finally, inside the rectangle, we've defined a Text object with the text "16:38:33" to mock up a standard time display.
If you run the app now, the text will appear at the top-left corner of our application window.
$ python main.py
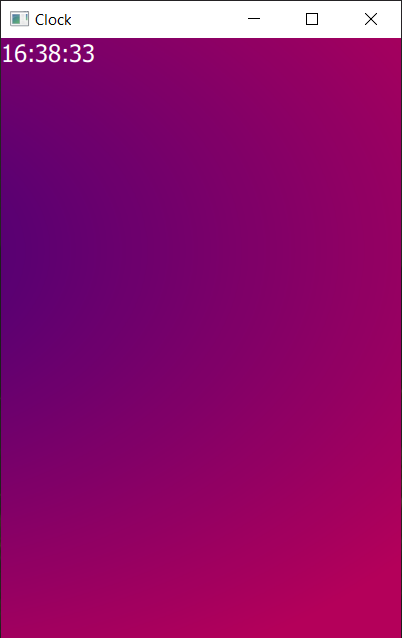 By default text appears in the top left
Let's move it somewhere else -- down to the bottom-left, with some margins to make it look nicer. In your QML code, update the Text object to include position anchors for the Text and change the size and color of the font.
main.qml
            Text {
                anchors {
                    bottom: parent.bottom
                    bottomMargin: 12
                    left: parent.left
                    leftMargin: 12
                }
                text: "16:38:33"
                font.pixelSize: 48
                color: "white"
            }
Run the application again as before.
$ python main.py
You will see the text has now moved to the bottom left.
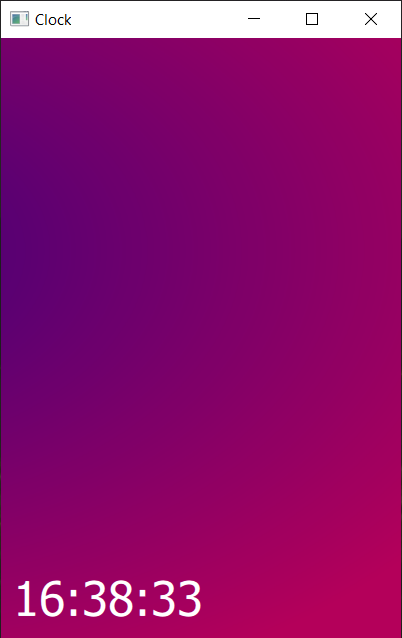 Application window with text in the bottom left
So far, our time display is just a fixed text string -- it doesn't update, and unless you run it at the right time, it's going to be wrong. Not the most useful of clocks! Next we'll add some Python code to get the current system time and update our clock display automatically.
Getting the time from Python
The Python standard library provides functions for handling time and date, including a number of options for getting the current time.
For example, the Python function time.gmtime() provides a struct containing the current GMT time, while time.localtime()
will give the time in your current local timezone.
Once you have a time struct you can pass this to the time.strftime() function to get a properly formatted string. The strftime function accepts
two arguments -- first a time format string, and second the time struct to use. The time format string uses tokens such as %H to place specific parts of the time date in a specific format.
For example, if you enter the following in a Python shell you'll get the current GMT (UTC) time output.
from time import strftime, gmtime
strftime("%H:%M:%S", gmtime())
The %H, %M and %S tokens tell strftime to insert the hours (24 hour, zero padded), minutes (zero padded) and seconds (zero padded) into the string.
You can read more about format codes for strftime in the Python documentation.
For local time, you can use the localtime method instead of gmtime.
from time import strftime, localtime
strftime("%H:%M:%S", localtime())
This adjusts to your computers local time settings and should output the same time displayed on your computer's clock.
If you're used to working with datetime objects, every datetime has a .strftime() method, which uses the same format strings and returns the same output.
For example, the following will give the same output as the localtime example above.
from time import strftime
from datetime import datetime
datetime.now().strftime("%H:%M:%S")
Updating our app time display
To pass our formatted time string from Python to QML we can use QML properties. First, let's define a
property on our QML ApplicationWindow called currTime. Update your QML code in main.qml as follows:
main.qml
...
ApplicationWindow {
    ...
    title: "Clock"
    property string currTime: "00:00:00"

    ...
The ... marks indicate where existing code should be left as it is.
Next, modify the text object to use the currTime property as its text value. When the currTime property is modified
the text label will update automatically (along with any other places it is used).
main.qml
...
            Text {
                ...
                text: currTime  // used to be; text: "16:38:33"
                font.pixelSize: 48
                color: "white"
            }

...
Finally, we need to send the current time, stored in the curr_time variable, from our Python code through to QML. Modify the Python code to add the time formatting code, using localtime() and then set this property onto the QML object. The following code will set the QML property currTime to value of the Python variable curr_time.
main.py
import sys

from PyQt5.QtGui import QGuiApplication
from PyQt5.QtQml import QQmlApplicationEngine

from time import strftime, localtime

app = QGuiApplication(sys.argv)

engine = QQmlApplicationEngine()
engine.quit.connect(app.quit)
engine.load('main.qml')

# Pass the current time to QML.
curr_time = strftime("%H:%M:%S", localtime())
engine.rootObjects()[0].setProperty('currTime', curr_time)

sys.exit(app.exec())
The code engine.rootObjects()[0] gets all the root objects from the QML engine as a list. Our ApplicationWindow object is a root object because it appears at the top of the hierarchy. Next we use [0] to select the first item in that list -- in our case, there is only one item, our ApplicationWindow and that is what is returned. The .setProperty method is then called on that object.
If you run the application now, you should see the correct time displayed in the window. This means the time will be correct when the application starts -- try closing it and re-running it to see the time update. But you'll notice that the time doesn't update yet -- we'll do that next.
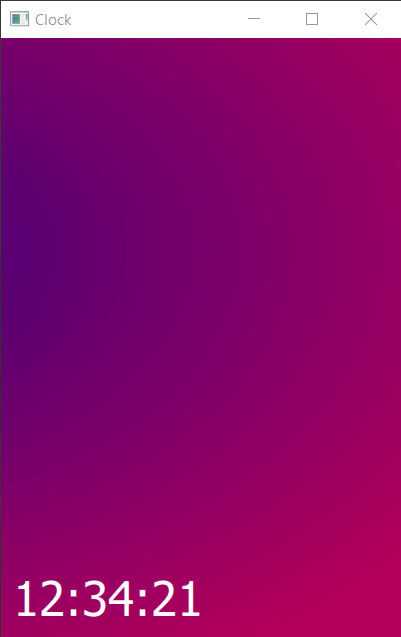 The correct time (at least it was when I took the screenshot)
Updating the time using timers
To update the timer we need to run our time fetching and formatting code on a regular interval (every second). There are two options for implementing this
- using a timer which fires every 1/10th second triggering our time method
- using a long-running thread, which calculates the time with a delay (sleep) between each update
In Qt timers are handled on the GUI thread main loop, meaning that each time the timer is triggered the GUI is blocked while the function is executed. If that function is long running this can become noticeable in the UI. In that case, using a thread makes more sense. But here, our time fetching and formatting code is very quick -- there will be no noticeable delay. For that reason, in this example we'll use a simple timer.
setProperty
Based on the code we have so far, the simplest approach to updating the time automatically is to just take our update code, wrap it inside a function and then call that function repeatedly using a timer. The following code shows this approach in action, using a QTimer with an interval of 100 msecs (1/10th second).
main.py
import sys

from PyQt5.QtGui import QGuiApplication
from PyQt5.QtQml import QQmlApplicationEngine
from PyQt5.QtCore import QTimer

from time import strftime, localtime

app = QGuiApplication(sys.argv)

engine = QQmlApplicationEngine()
engine.quit.connect(app.quit)
engine.load('main.qml')

def update_time():
    # Pass the current time to QML.
    curr_time = strftime("%H:%M:%S", localtime())
    engine.rootObjects()[0].setProperty('currTime', curr_time)

timer = QTimer()
timer.setInterval(100)  # msecs 100 = 1/10th sec
timer.timeout.connect(update_time)
timer.start()

sys.exit(app.exec())
If you run this you'll see the time updating correctly.
You may also notice that when the application is first run the time displays as '00:00:00'
(the default value) for a second. That is because the UI is rendered before the first interval timer
executes. You can avoid this by adding a call to update_time() just before app.exec() is called, e.g.
- PyQt
- PySide
update_time() # initial startup
sys.exit(app.exec())
update_time() # initial startup
sys.exit(app.exec_())
Now, when the app launches it will be showing the correct time immediately.
Using signals
While this approach of setting properties from the Python code works well for this small example it's not ideal as your applications grow in size. By hooking your Python code to change specific properties in your QML you are tying your Python code to the structure of the UI. That makes it easy to break things when restructuring your applications. Just like in the Qt Widgets API you can use Qt signals to avoid this problem: your code can emit signals without needing to know where they will be received, or how they will be used -- and you can even hook a single signal up to multiple receivers. This keeps your logic and UI code nicely decoupled.
If you're not familiar with Qt signals, take a look at our Signals, Slots & Events tutorials.
Let's rework our example to make use of Qt signals in Python & QML to achieve the same result.
First we must define our signals in the main.py file. Signals can only be defined on objects that are subclassed from QObject so we'll need to implement a small class. This is also a logical place to put our time-handling code to keep things nicely self-contained. We'll also define our signal for passing the current time to QML.
Multiple signals can be handled under a single QObject class and it often makes sense to use a single class for simplicity.
main.py
import sys

from PyQt5.QtGui import QGuiApplication
from PyQt5.QtQml import QQmlApplicationEngine
from PyQt5.QtCore import QTimer, QObject, pyqtSignal

from time import strftime, localtime

app = QGuiApplication(sys.argv)

engine = QQmlApplicationEngine()
engine.quit.connect(app.quit)
engine.load('main.qml')


class Backend(QObject):

    updated = pyqtSignal(str, arguments=['time'])

    def __init__(self):
        super().__init__()

        # Define timer.
        self.timer = QTimer()
        self.timer.setInterval(100)  # msecs 100 = 1/10th sec
        self.timer.timeout.connect(self.update_time)
        self.timer.start()

    def update_time(self):
        # Pass the current time to QML.
        curr_time = strftime("%H:%M:%S", localtime())
        self.updated.emit(curr_time)


# Define our backend object, which we pass to QML.
backend = Backend()

engine.rootObjects()[0].setProperty('backend', backend)

# Initial call to trigger first update. Must be after the setProperty to connect signals.
backend.update_time()

sys.exit(app.exec())
While this looks like a lot of changes, the majority of the code is exactly the same, just reorganized to put everything under the container class. Everything in __init__ will be run when we create an instance of the Backend class using backend = Backend().
The signal definition (repeated below) creates a signal which accepts a single parameter -- a string. This will be sent with the signal to the receivers. The arguments= parameter is used to define the names under which the arguments will be known in QML (if using keyword arguments).
- PyQt
- PySide
updated = pyqtSignal(str, arguments=['time'])
updated = Signal(str, arguments=['time'])
You'll also notice that we pass our backend object through to a QML property (also named backend). This allows the signal we've just implemented to be used from the QML code and hooked up to an appropriate target.
engine.rootObjects()[0].setProperty('backend', backend)
As before we need to implement the property in QML which these will set. Previously when defining our property to receive the formatted time string, we used a string type. This isn't appropriate for the Backend object, as it's not a string. To receive the Backend object (which is a QObject) from Python we need to use the QtObject type.
main.qml
...
property string currTime: "00:00:00"
property QtObject backend
...
There are not that many types. QML converts python base types into bool, int, double, string, list, QtObject and var. The var type is a generic handler which can handle any Python type.
To receive the signal itself, we need to define a Connections object, setting it's target as our backend property (in QML).
main.qml
ApplicationWindow {
    ...

    Connections {
        target: backend
    }

    ...
}
We can now implement any other logic we like inside this Connections object to handle the signals on the backend object. Let's create a signal handler to handle our updated signal. Signal handlers are automatically named using the capitalized form of the signal name we chose in Python, preceded by lowercase on. Underscores and existing capitalization are ignored.
| Python name | QML name |
|---|---|
| mySignal | onMySignal |
| mysignal | onMysignal |
| my_signal | onMy_signal |
main.qml
ApplicationWindow {
    ...

    Connections {
    target: backend

    function onUpdated(msg) {
        currTime = msg;
    }

    ...
}
The above code shows the signal handler for the updated signal, named onUpdated. This receives the current time as a string (named msg) and sets that onto the QML property currTime. As before, setting this property automatically updates the associated text label.
If you run the application now, you'll see the time updating exactly the same as before!
We could replace the Python time formatting with formatting code in Javascript inside QML if we wanted and send a timestamp as a signal. In fact, you can get the time and define timers in QML too!
Packaging Python Applications with PyInstaller by Martin Fitzpatrick — This step-by-step guide walks you through packaging your own Python applications from simple examples to complete installers and signed executables.
Removing the window decorations
To create a desktop-widget like application you can hide the window decorations on your QML app. This removes the title bar and buttons for closing/minimizing the app. However, you can still close the window from the taskbar if you need to. Make the following changes to the top of the QML file, setting the flags property and positioning the widget into the bottom right of the display.
main.qml
...
ApplicationWindow {
    visible: true
    width: 400
    height: 600
    x: screen.desktopAvailableWidth - width - 12
    y: screen.desktopAvailableHeight - height - 48
    title: "Clock"
    flags: Qt.FramelessWindowHint | Qt.Window
...
The code sets x, y for the window and adds the flag Qt.FramelessWindowHint to make the window frameless. The Qt.Window flag ensures that even though the window is frameless, we still get an entry on the taskbar. Run it, and you will see the window we've created.
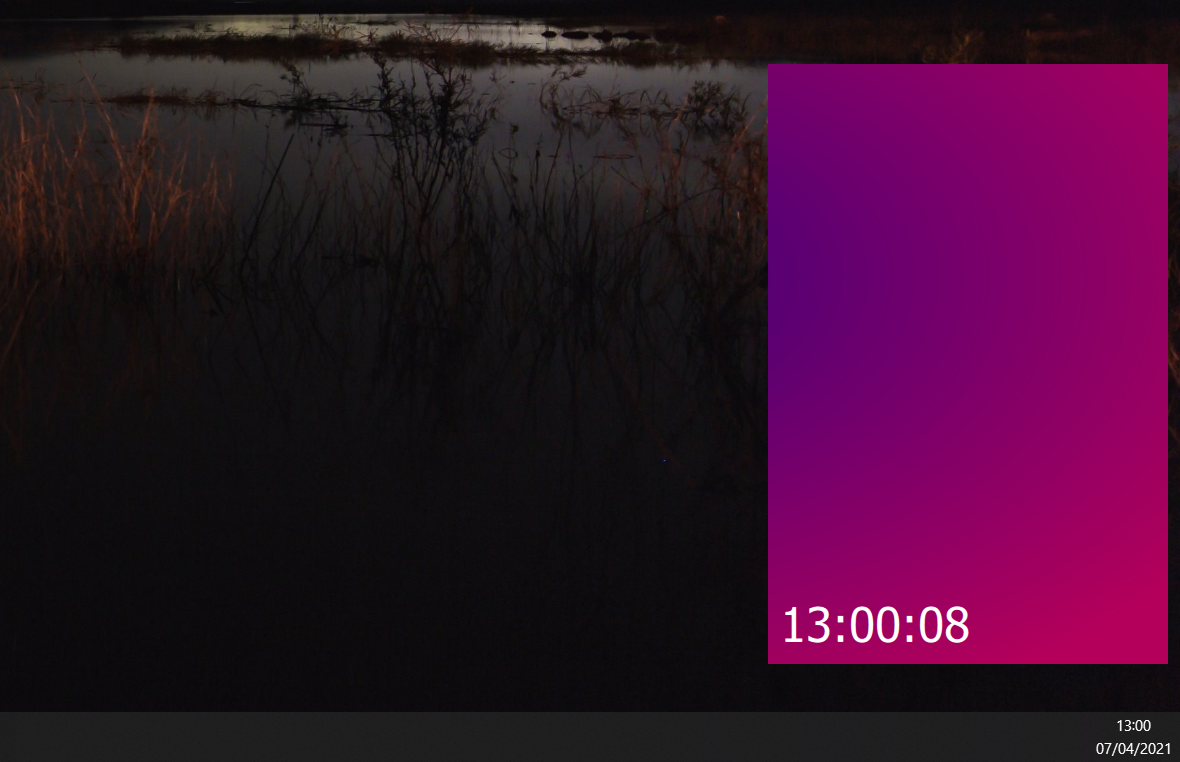 The final view with the updating clock and no window decorations
In the next tutorial we'll expand on this simple clock by using image manipulations, transitions and animations to build a fully-functional analog clock.
The complete final code
Below is the complete final code for PyQt5.
main.py
import sys

from PyQt5.QtGui import QGuiApplication
from PyQt5.QtQml import QQmlApplicationEngine
from PyQt5.QtCore import QTimer, QObject, pyqtSignal

from time import strftime, localtime

app = QGuiApplication(sys.argv)

engine = QQmlApplicationEngine()
engine.quit.connect(app.quit)
engine.load('main.qml')


class Backend(QObject):

    updated = pyqtSignal(str, arguments=['time'])

    def __init__(self):
        super().__init__()

        # Define timer.
        self.timer = QTimer()
        self.timer.setInterval(100)  # msecs 100 = 1/10th sec
        self.timer.timeout.connect(self.update_time)
        self.timer.start()

    def update_time(self):
        # Pass the current time to QML.
        curr_time = strftime("%H:%M:%S", localtime())
        self.updated.emit(curr_time)


# Define our backend object, which we pass to QML.
backend = Backend()

engine.rootObjects()[0].setProperty('backend', backend)

# Initial call to trigger first update. Must be after the setProperty to connect signals.
backend.update_time()

sys.exit(app.exec())
main.qml
import QtQuick 2.15
import QtQuick.Controls 2.15

ApplicationWindow {
    visible: true
    width: 400
    height: 600
    x: screen.desktopAvailableWidth - width - 12
    y: screen.desktopAvailableHeight - height - 48
    title: "Clock"
    flags: Qt.FramelessWindowHint | Qt.Window
    property string currTime: "00:00:00"
    property QtObject backend

    Rectangle {
        anchors.fill: parent

        Image {
            sourceSize.width: parent.width
            sourceSize.height: parent.height
            source: "./images/background.png" srcset="https://ik.imagekit.io/mfitzp/pythonguis/static/tutorials/qml-qt-quick/first-qml-project/background.png?tr=w-100 100w, https://ik.imagekit.io/mfitzp/pythonguis/static/tutorials/qml-qt-quick/first-qml-project/background.png?tr=w-200 200w, https://ik.imagekit.io/mfitzp/pythonguis/static/tutorials/qml-qt-quick/first-qml-project/background.png?tr=w-400 400w, https://ik.imagekit.io/mfitzp/pythonguis/static/tutorials/qml-qt-quick/first-qml-project/background.png?tr=w-600 600w" loading="lazy" width="564" height="1003"
            fillMode: Image.PreserveAspectCrop
        }

        Rectangle {
            anchors.fill: parent
            color: "transparent"


            Text {
                anchors {
                    bottom: parent.bottom
                    bottomMargin: 12
                    left: parent.left
                    leftMargin: 12
                }
                text: currTime  // used to be; text: "16:38:33"
                font.pixelSize: 48
                color: "white"
            }

        }

    }

    Connections {
        target: backend

        function onUpdated(msg) {
            currTime = msg;
        }
    }

}
Now you have your basic QML application, you should experiment with customizing and changing the behavior. Try changing the background image, modifying the text color or sending different (or multiple bits) of information from Python to your app.